Saturday, November 25, 2017

Store ArrayList in SharedPreferences

Store ArrayList In SharedPreferences:


In Shared Preference, is it store arraylist ?, Usually in shared preference we have to store string but in this post we are going to see how to store arraylist in sharedpreference.


Method:1


SharedPreferences sharedPrefs = PreferenceManager.getDefaultSharedPreferences(context);
Editor editor = sharedPrefs.edit();
Gson gson = new Gson();

String json = gson.toJson(arrayList);

editor.putString(TAG, json);
editor.commit();

Read;

SharedPreferences sharedPrefs = PreferenceManager.getDefaultSharedPreferences(context);
Gson gson = new Gson();
String json = sharedPrefs.getString(TAG, null);
Type type = new TypeToken<ArrayList<ArrayObject>>() {}.getType();
ArrayList<ArrayObject> arrayList = gson.fromJson(json, type);


Method: 2

SharedPreferences prefs=this.getSharedPreferences("yourPrefsKey",Context.MODE_PRIVATE);
Editor edit=prefs.edit();

Set<String> set = new HashSet<String>();
set.addAll(your Arraylist Name);
edit.putStringSet("yourKey", set);
edit.commit();

Retrieve Arraylist from Shared Preferences

Set<String> set = prefs.getStringSet("yourKey", null);
List<String> sample=new ArrayList<String>(set);

Thursday, November 9, 2017

KEYBOARD HIDE WHILE OPEN NAVIGATION DRAWER

KEYBOARD HIDE WHILE OPEN NAVIGATION DRAWER:

Hi Android guys! Most of the members ask softkeyboard and navigation drawer both were show and how to fix it .........

So Today we are going to how to hide keyboard while open navigation drawer.


Solution 

drawerToggle = new ActionBarDrawerToggle(this, mDrawerLayout, toolbar, R.string.app_name, R.string.app_name) {

            @Override
            public void onDrawerClosed(View drawerView) {
                // Code here will be triggered once the drawer closes as we dont want anything to happen so we leave this blank
                super.onDrawerClosed(drawerView);
                InputMethodManager inputMethodManager = (InputMethodManager)
                        getSystemService(Context.INPUT_METHOD_SERVICE);
                inputMethodManager.hideSoftInputFromWindow(getCurrentFocus().getWindowToken(), 0);
            }

            @Override
            public void onDrawerOpened(View drawerView) {
                // Code here will be triggered once the drawer open as we dont want anything to happen so we leave this blank
                super.onDrawerOpened(drawerView);
                InputMethodManager inputMethodManager = (InputMethodManager)
                        getSystemService(Context.INPUT_METHOD_SERVICE);
                inputMethodManager.hideSoftInputFromWindow(getCurrentFocus().getWindowToken(), 0);
            }
        };


Happy coding .......

Tuesday, November 7, 2017

Fresco

Fresco:

Hi Guys! now we are going to see about Fresco !!!!!!


  • Fresco is a powerful system for displaying images in android applications,It takes care of image loading and display,
  • Fresco supports android2.3 and later.
  • For Images Fresco can load it from network, local storage or local resources. To save data and CPU,
  • it has three levels of cache; one in internal storage and two in memory.


Features
  • Memory
  • Drawing
  • Animations
  • Loading
  • Streaming

1.Memory

A decompressed image - an Android Bitmap - takes up a lot of memory. This leads to more frequent runs of the Java garbage

collector. This slows apps down. The problem is especially bad without the improvements to the garbage collector made in
Android 5.0.On Android 4.x and lower, Fresco puts images in a special region of Android memory. It also makes sure that
images are automatically released from memory when they’re no longer shown on screen. This lets your application run faster
- and suffer fewer crashes.

2.Drawing


Fresco uses Drawees for display. These offer a number of useful features:

Scale the image to a custom focus point, instead of the center
Show the image with rounded corners, or a circle
Let users tap the placeholder to retry load of the image, if the network load failed
Show custom backgrounds, overlays, or progress bars on the image
Show a custom overlay when the user presses the image.

3.Animations

Animated GIFs and WebPs can be challenging for apps. Each frame is a large Bitmap, and each animation is a series of frames.
Fresco takes care of loading and disposing of frames and managing their memory.

4.Loading

Fresco’s image pipeline lets you customize the load in a variety of ways:

Specify several different uris for an image, and choose the one already in cache for display
Show a low-resolution image first and swap to a higher-res one when it arrives
Send events back into your app when the image arrives
If the image has an EXIF thumbnail, show it first until the full image loads (local images only)
Resize or rotate the image
Modify the downloaded image in-place
Decode WebP images, even on older versions of Android that don’t fully support them.

5.Streaming

Progressive JPEG images have been on the Web for years. These let a low-resolution scan of the image download first,
 then gradually improve the quality as more of the image downloads. This is a lifesaver for users on slow networks.
Android’s own imaging libraries don’t support streaming. Fresco does. Just specify a URI, and your app will automatically update its display as more data arrives.

Getting started with Fresco

Step 1

In your build.gradle file.
dependencies {
  // your app's other dependencies
  compile 'com.facebook.fresco:fresco:1.5.0'
}

optional modules may also be added:

// For animated GIF support
  compile 'com.facebook.fresco:animated-gif:1.5.0'

  // For WebP support, including animated WebP
  compile 'com.facebook.fresco:animated-webp:1.5.0'
  compile 'com.facebook.fresco:webpsupport:1.5.0'

  // For WebP support, without animations
  compile 'com.facebook.fresco:webpsupport:1.5.0'

  // Provide the Android support library (you might already have this or a similar dependency)
  compile 'com.android.support:support-core-utils:24.2.1'

Step 2

Initialize Fresco

@Override
    public void onCreate() {
        super.onCreate();
        Fresco.initialize(this);
    }

Step 3

In the AndroidManifest.xml

<uses-permission android:name="android.permission.INTERNET" />

Step 4

add a custom namespace to the top-level element.

<LinearLayout
    xmlns:android="http://schemas.android.com/apk/res/android"
    xmlns:fresco="http://schemas.android.com/apk/res-auto"
    android:layout_height="match_parent"
    android:layout_width="match_parent"
    >

Step 5

Then add the SimpleDraweeView to the layout

<com.facebook.drawee.view.SimpleDraweeView
    android:id="@+id/my_image_view"
    android:layout_width="130dp"
    android:layout_height="130dp"
    fresco:placeholderImage="@drawable/my_drawable"
    />

Step 6

Uri uri = Uri.parse("https://raw.githubusercontent.com/facebook/fresco/master/docs/static/logo.png");
SimpleDraweeView draweeView = (SimpleDraweeView) findViewById(R.id.my_image_view);
draweeView.setImageURI(uri);

(-)
- Huge size of library
- No Callback with View, Bitmap parameters
- SimpleDraweeView doesn't support wrap_content
- Huge size of cache
(+)
- Pretty fast image loader (for small && medium images)
- A lot of functionality(streaming, drawing tools, memory management, etc)
- Possibility to setup directly in xml (for example round corners)
- GIF support
- WebP support


Saturday, November 4, 2017

Android Phone Not Detect While Run in Android studio

Android Phone Not Detect While Run in Android studio

Hi Android Guys ! Today  we are going to see about mobile devices not detected in android studio While run the project , then see how to solve .

Most of the members ask how to resolve the problem .

Step 1
Find the android device model , Setting > about device > Model number (Android  Device)

Step 2
In google Search > type device name followed by Usb driver then download the UsbDriver

Step 3
Right Click, My computer > properties >System Window open then see the left panel

In Left Panel > Device Manager >see Other Devices >Unknown Devices


Step 4

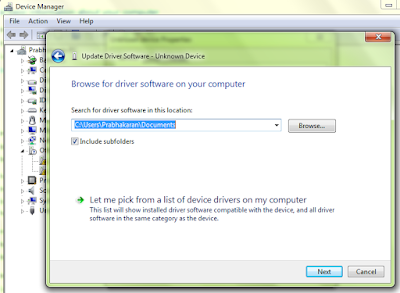
Right Click the unknown devices > properties > Unknown device properties open.Then the Open dialog see the Update Driver button, Click the button 

Step 5

Then Click "Let me pick from a list of device driver on my computer"


Then Update driver software, Android studio will sure detect mobile phone will run the project..

Friday, November 3, 2017

Bundle

Bundle :

Hi Android Guys!

Today we are going to see about Bundle concept in android, Here how to create bundle and how to use in another activity.

Step 1

In First Activity,

 // Creating Bundle object

    Bundle b = new Bundle();                     

  // Storing data into bundle

     b.putString("fullname", fullname);
     b.putLong("phoneNumber", phone);
     b.putDouble("age", ageDouble);
     b.putBoolean("married", isMarried);


    // Creating Intent object

       Intent in = new Intent(AndroidBundleExample.this, AndroidSecondActivity.class); 

    // Storing bundle object into intent

        in.putExtras(b);
        startActivity(in);

Step 2

     //Second getting activity

     // get the Intent that started this Activity

        Intent in = getIntent();       
        Bundle b = in.getExtras(); 

        // getting data from bundle

        String nameString = b.getString("fullname");
        long phoneNumberLong = b.getLong("phoneNumber");
        String phoneNumberString = Long.toString(phoneNumberLong);
        double ageDouble = b.getDouble("age");
        String ageString = Double.toString(ageDouble);

Thursday, November 2, 2017

Eclipse Opening Error -- ERROR FIXING - 3

Error when loading SDK - Eclipse:

Hi android Guys!

When we tried to open the eclipse it shown the following error .


Solution


It might be a permission issue. Make sure you have writing permissions for that folder.
Try starting Eclipse or the SDK Manager as Administrator.


Right click the eclipse icon, Run as Administrator then the above issue is not come..


Enjoy Coding .....

Installation failed with message INSTALL_CANCELED_BY_USER -- ERROR FIXING - 2

Installation failed with message INSTALL_CANCELED_BY_USER:

Hi Android Guys !

Some times we tried to run the android studio project but we get the following error.


Solution

Installation failed with message INSTALL_CANCELED_BY_USER. It is possible that this issue
is resolved by uninstalling an existing version of the apk if it is present, and then re-installing

Path: Android Studio Preference / Build, Execution, Deployment / Instant Run

Go to Android Studio Preference (for Mac) or Settings (for windows)

Choose Build, Execution, Deployment tab

Choose Instant Run

Uncheck Enable Instant Run to hot swap code/resources changes on deply (default enabled)

Wednesday, November 1, 2017

Retrofit

Retrofit:
Today we are going to look at  awesome library Retrofit to make the http calls. Retrofit is denitely the better alternative to volley in terms of ease of use, performance, extensibility and other things. It is a type-­safe REST client for Android built by Square. Using this tool android developer can make all network stuff much more easier.


Step 1


Open build.gradle and add Retrofit, Gson dependencies.

dependencies {
    compile fileTree(dir: 'libs', include: ['*.jar'])
    testCompile 'junit:junit:4.12'
    compile 'com.android.support:appcompat-v7:23.3.0'

    // retrofit, gson
    compile 'com.google.code.gson:gson:2.6.2'
    compile 'com.squareup.retrofit2:retrofit:2.0.2'
    compile 'com.squareup.retrofit2:converter-gson:2.0.2'
}

Step 2

Add INTERNET permissions in AndroidManifest.xml file

<uses-permission android:name="android.permission.INTERNET"/>

Step 3

//Retrofit
private parsing p;
private Retrofit retrofit;
private int mStatusCode;
private APICallInterface service;
final OkHttpClient client = new OkHttpClient().newBuilder()
.connectTimeout(1, TimeUnit.MINUTES)
.readTimeout(1, TimeUnit.MINUTES)
.build();


Step 4

In onCreate():

p = new parsing();
/** Creating REST API Calls **/
retrofit = new Retrofit.Builder()
.baseUrl(p.url_server)
.addConverterFactory(GsonConverterFactory.create())
.client(client)
.build();
service = retrofit.create(APICallInterface.class);


private void callRetrofit() {

        String strUrl = baseUrl + "posts";

        Call<ResponseBody> caller = service.callAPI(strUrl);
        caller.enqueue(new Callback<ResponseBody>() {
            @Override
            public void onResponse(Call<ResponseBody> caller, retrofit2.Response<ResponseBody> response) {

                try {
                    String reponse = response.body().string();
                    mStatusCode = response.code();
                    Log.e("Response",reponse);

                } catch (Exception e) {
                    e.printStackTrace();
                }
            }

            @Override
            public void onFailure(Call<ResponseBody> call, Throwable t) {

                if (t instanceof SocketTimeoutException) {
                    Log.v("SocketTimeOut", "SocketTimeOut");
                    Toast.makeText(MainActivity.this, "TimeOut"
                            , Toast.LENGTH_SHORT).show();
                }
            }
        });
    }


Step 5

create Interface in app folder

public interface APICallInterface {

   @GET
   @Headers("Connection:close")
   Call<ResponseBody> callAPI(@Url String url);

   @GET
   @Headers("Connection:close")
   Call<ResponseBody> callAPI(@Url String url, @QueryMap Map<String, String> parameters);

   @POST
   @Headers("Connection:close")
   Call<ResponseBody> postToAPI(@Url String url, @Body RequestBody parameter);

   @PUT
   @Headers("Connection:close")
   Call<ResponseBody> putToAPI(@Url String url, @Body RequestBody parameter);


}


Download

Sample Project 

Happy Coding....☺☺☺

Geocoding

Geocoding:

Geocoding is the process of converting the addresses (postal address) into geo coordinates as latitude and longitude.
Reverse geocoding is converting a geo coordinate latitude and longitude to an address.
In this tutorial we will be doing reverse geo coding and get the addresses of the passed coordinates

Step 1

<uses-permission android:name="android.permission.ACCESS_FINE_LOCATION" />
<uses-permission android:name="android.permission.INTERNET" />

To Achieve Geocode, use the below code

Geocoder gc = new Geocoder(context);
if(gc.isPresent()){
List<Address> list = gc.getFromLocationName(“155 Park Theater, Palo Alto, CA”, 1);
Address address = list.get(0);
double lat = address.getLatitude();
double lng = address.getLongitude();
}

To Achieve Reverse Geocode, use the below code

Geocoder gc = new Geocoder(context);
if(gc.isPresent()){
List<address> list = gc.getFromLocation(37.42279, -122.08506,1);
Address address = list.get(0);
StringBuffer str = new StringBuffer();
str.append(“Name: ” + address.getLocality() + “\n”);
str.append(“Sub-Admin Ares: ” + address.getSubAdminArea() + “\n”);
str.append(“Admin Area: ” + address.getAdminArea() + “\n”);
str.append(“Country: ” + address.getCountryName() + “\n”);
str.append(“Country Code: ” + address.getCountryCode() + “\n”);
String strAddress = str.toString();
}